I don't remember where I first came across the idea to make a fabric baby book (perhaps it was this book, or perhaps it was Pinterest), but I am now neck deep in the project. However it came about, I have taken the idea and brought it to the next level. That's right. I have taken what could have been a simple weeklong project and turned it into a two-month-long (or is it more?) art piece. Maybe "art piece" is a little over the top, but the time, energy, patience, and love that have gone into it so far seems to warrant the designation.
I learned a lot from making this fabric book, partly from all the research I did (yes, research. Hours and hours of it, I must say) and partly from just thinking and doing. The first thing I set out to do was figure out if I could make my own printable fabric. I was pretty sure I could, I just needed to find the best way. To Pinterest I went. I settled on using fusible web (here is the tutorial I found) since it would allow me to iron all the pictures directly to the fabric after printing. I ironed unbleached muslin to the fusible web and then cut it to 8.5 x 11. Fusible web is only 22 inches wide, so make sure you take that into account when you buy it. The backing of the fusible web was stiff enough to get the fabric through an inkjet printer safely without wrinkling.
After handling the pictures for a while, I realized that I should have de-linted the fabric before putting it through the printer. Some of the pictures ended up with white spots or lines where the lint fell off after printing (luckily, most people will be so impressed with the overall result that they won't even notice it).
After handling the pictures for a while, I realized that I should have de-linted the fabric before putting it through the printer. Some of the pictures ended up with white spots or lines where the lint fell off after printing (luckily, most people will be so impressed with the overall result that they won't even notice it).
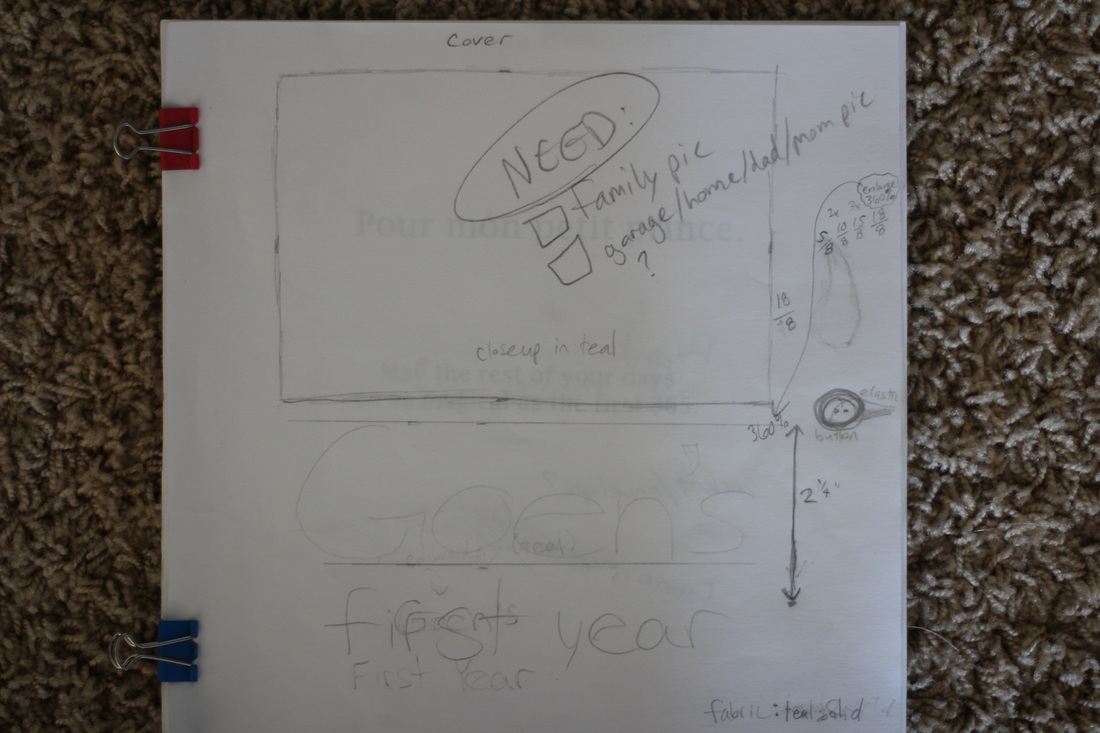
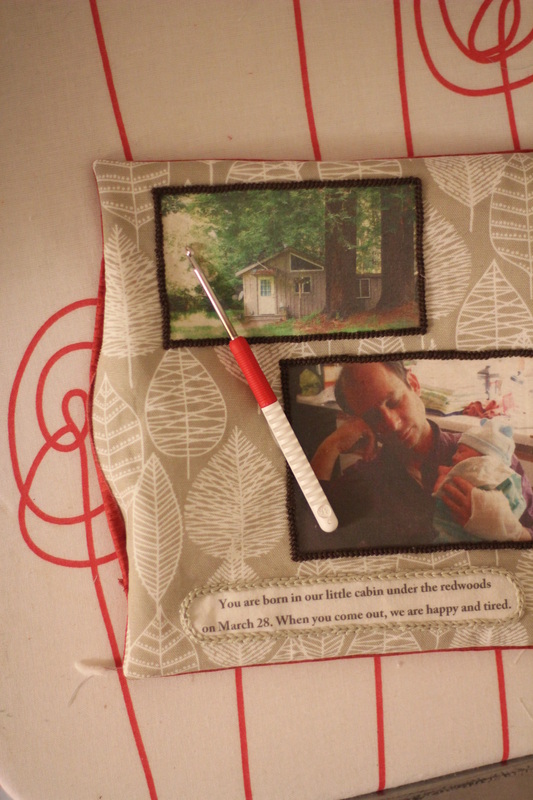
I went through all the pictures we had taken since baby's birth and picked out the ones I loved and ones that represented significant moments. I made up a story about his first year to go with the pictures, opting for the present tense since it makes the story seem more real, to me at least. At some point during this process I realized that I would have too many pages to use the common assembly method of sewing a stack of full page spreads together down the center. I typed the story and printed it to make sure I liked the font and size. I also used the printout to measure how much space the text would take up and how much space I had for pictures.
I created a paper mockup book so I could make notes about which pictures went with each part of the story, what fabric I would use, and how I would embellish each page. I highly recommend not skipping this step. I found it very helpful throughout the entire process.


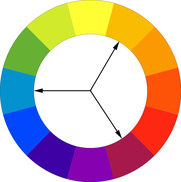
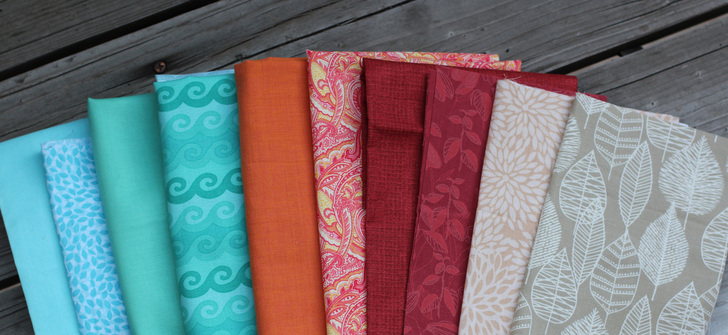
Since I have no idea what my little one's favorite color will be when he grows up, I decided to use colors that I thought matched his personality and general aesthetic. I just love the way he looks in turquoise, so of course that was one of the fabric colors. I also like the idea of orange on him, so I added that to the list. Then I went to Google and looked up color wheels. I found turquoise and light orange and noticed that they worked perfectly into a triad with a dark shade of red. I added a neutral tan and another cool shade of light blue to balance the hotter red and orange and I had my palette. I included solids, subtle prints, and bold prints to create a balanced look.
One of the things I knew I wanted to include in the book was an embroidery of all of our handprints on the last page, so I had to make the pages big enough to fit my husband's hand, plus the text and a margin. I settled on 9 inches. After deciding what size I wanted my finished pages to be, I made a cardstock template that was 10 inches square (at this point I had not yet decided what my seam allowance was going to be, but I was thinking 1/2" or a little less). I placed my fabric on a cutting mat and put my template over it. Lining up the edge of my acrylic ruler with the edge of the template, I used a rotary cutter to slice through the fabric. I moved the ruler to another side and cut. I repeated the procedure with the cotton batting that would go between the pages. I ended up with 20 squares of fabric and 10 squares of batting.
Once I had my pages cut, I went on to decide what I wanted the cover dimensions to be. I knew I wanted the cover to wrap around all the pages without any seams, and I also wanted it to go another 1/4" past the pages so it would be like a hardback book cover. Since I only needed one, I didn't make a template. I just decided what the dimensions would need to be and cut the outside cover fabric (in turquoise) and the inside cover fabric (a plain, unbleached muslin). To figure out how wide the spine would need to be, I measured the height of my stack of pages and batting and just added a little since the edges of every page would be thicker due to the seams, which turned out to be about 2 inches. I also cut a piece of stiff, sew-in interfacing to put inside the cover after it was sewn and turned right side out (no need to add a seam allowance to this piece).
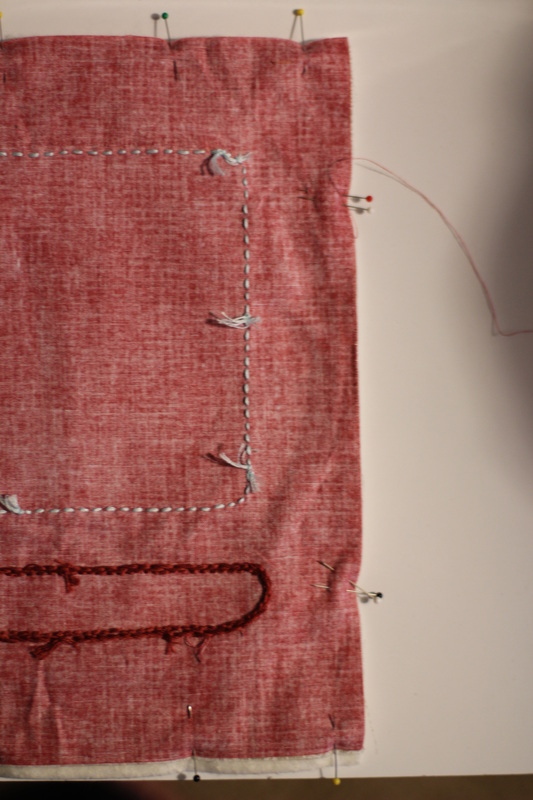
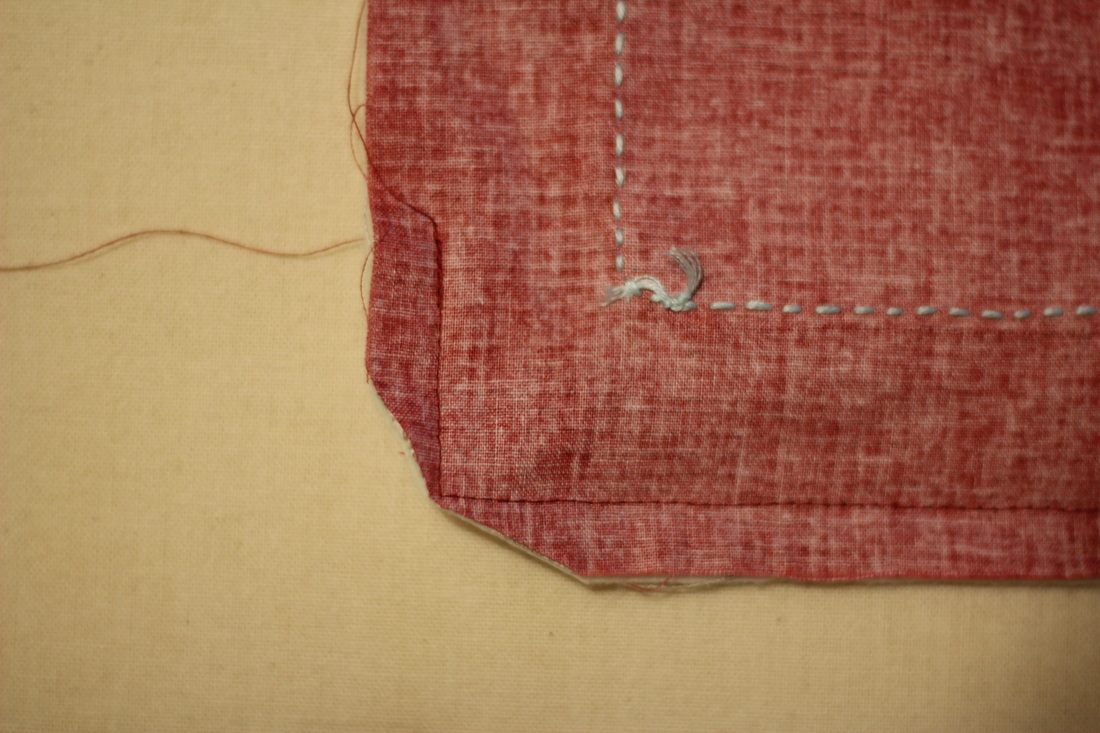
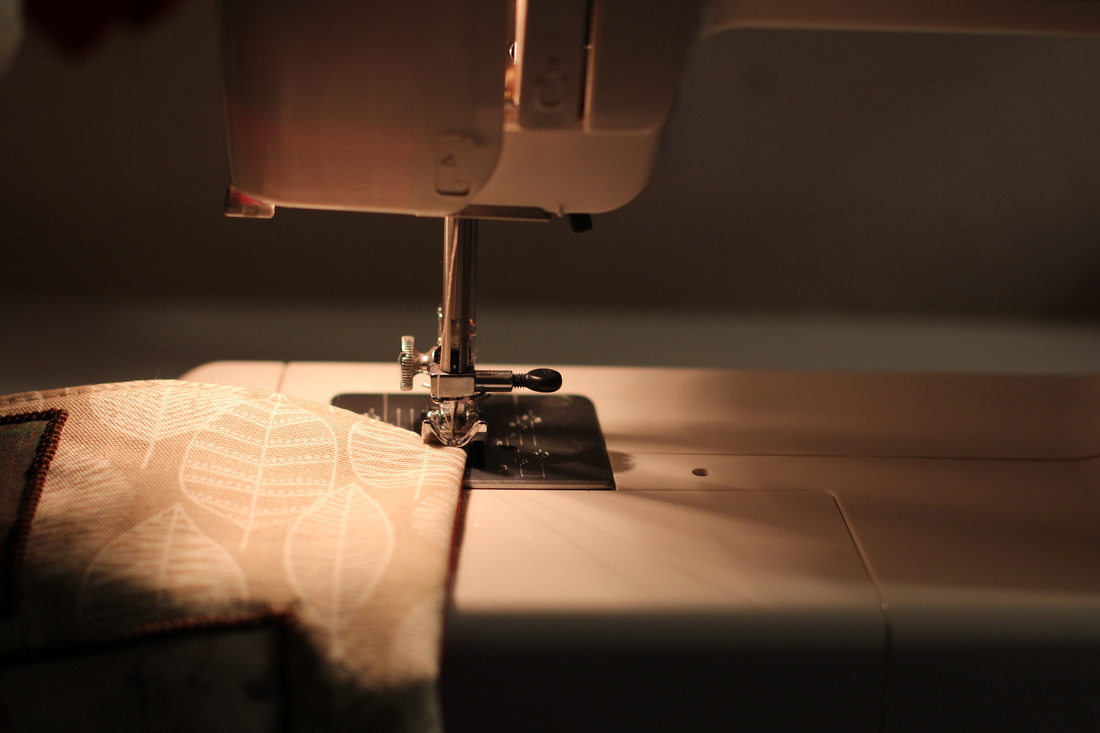
I'll talk about the embroidery I did in a later post, but for now I will say that it is essential to stitch the printed text and pictures to the base fabric. Fusible web is not permanent. The edges tend to pull away (especially when it's ironed onto more textured fabric) and the pictures might fray. Plus, if you plan on giving it to a child, those edges will be pulled up until the whole thing comes off. So stitch it all down, whether it's with a straight stitch on your sewing machine or a decorative stitch by hand or something else. After I completed this step on back to back pages, I started to sew them together. To do this, I put the pages right sides together and placed them on top of a piece of batting. I pinned it all together, making sure to mark where I wanted to leave my opening for turning it right side out (first picture below). To make it as invisible as possible, I placed it on the spine side of every page. That way I could topstitch around the pages to seal the opening and not worry about making the edges flush with a ladder stitch. Since the batting makes it so bulky, I left a 5 or 6 inch opening. I ended up using a 3/8" seam allowance, and I'm glad I did. After sewing the page, I clipped the corners to reduce bulk and help it lay flat. I prefer to double cut my corners. To do this, I cut the corner once just outside the stitching and then cut each of the two corners created by the first cut (see the second picture below for clarification). Then I turned the page right side out by reaching between the two fabric pages and pulling them through the hole. Using a small crochet hook, I poked out the corners so they were nice and sharp (third picture below). Lastly, I ironed the page edges and topstitched around all four sides (fourth picture below), beginning and ending at the opening in hopes that the overlapped stitching would go unnoticed. Since some of the pictures ended up closer to the edge than I anticipated, I did a very narrow topstitch. I lined up the edge of the page with the inner notch of my sewing machine foot, which put the stitches about 1/8" from the edge.
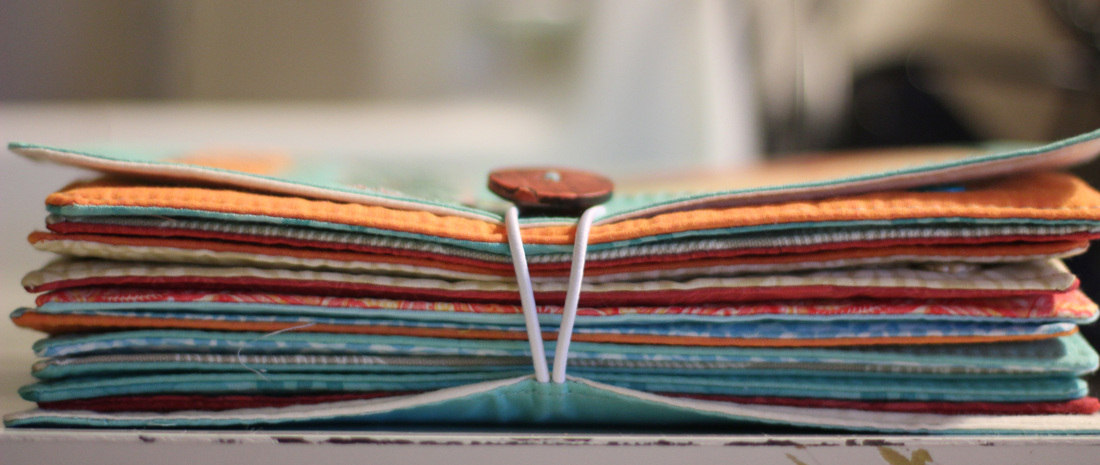
I have to admit that I'm still unsure about how I am going to put the book together. I am considering putting eyelets in the spine and tying the pages through the eyelets (an idea I saw in the book Fabric Scrapbooking by Donna Downey). A couple other ideas that might work are whipstitching the pages together or sewing the edge of each page to an inner spine before attaching them to the cover. I still need to do some thinking on this one. But, however it comes together, I'll be glad to have this project finished so I can start reading it with Baby. I love it when he sits himself down in my lap when I read to him.
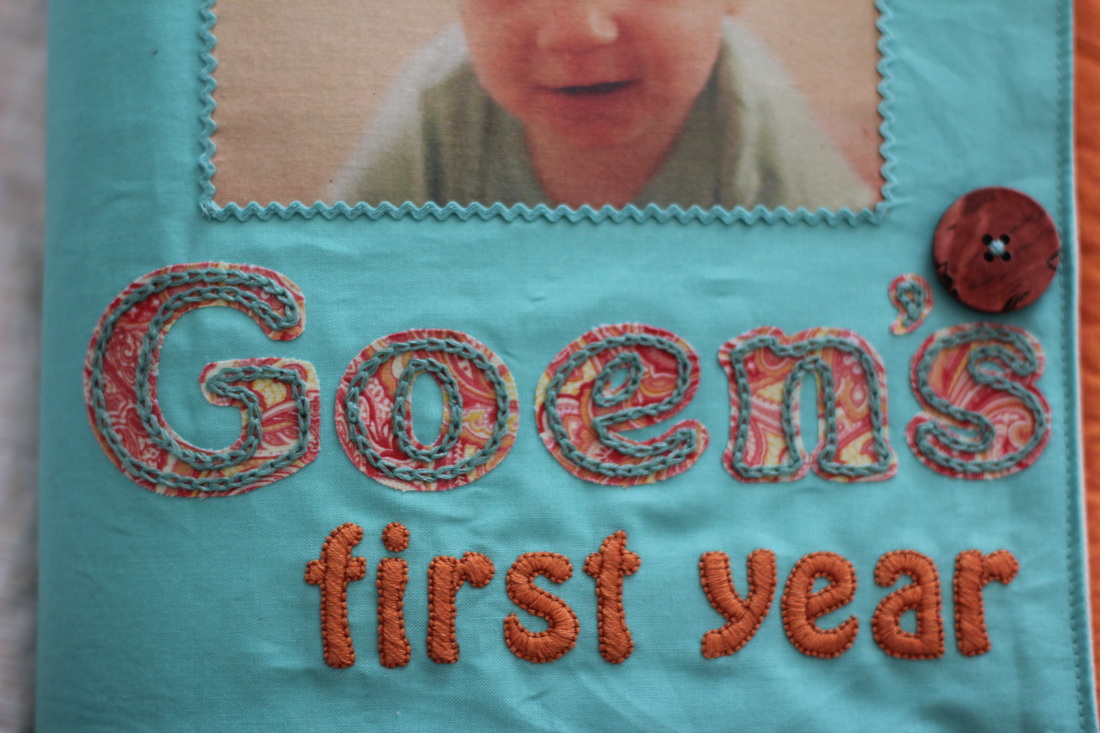
This fabric book was such a long process that I'm sure I've forgotten to describe or explain some parts of it. If you have embarked on a similar project, or are considering it, don't hesitate to ask for clarification or advice in your comments. And stay tuned for the embroidery post to see pictures of the final product, and to find out how I put it all together (I can't wait to find out myself!). Until then, here is a little teaser: a picture of the cover embroidery.
I could not have completed this project without others from whom I received help, inspiration, and tutorials. A list of some of the most helpful resources can be found below. Lastly, I must thank my parents for letting me use their printer on a project that most certainly used up lots of ink (thanks mom and dad!).
Links (in no particular order):
Fabric book from Simply Me
Fabric scrapbook from Moda Bake Shop
Memory book from gentlework
Fabric book from Shade Tree Art
Fabric book from inlovetostitch
Fabric baby book from Little Ladybird
Texture book from Lella Boutique
Felt applique book from Posie Gets Cozy
Some useful search terms if you need more ideas:
mixed media journal
fabric scrapbook
fabric art journal
fabric baby book
fabric memory book
quilted book
fabric collage book
quiet book
...
Mix and match terms for different search results.

