I've done it! I finished the entry I started three weeks ago for the Wise Craft contest. And just days before the deadline. It took some time to do the embroidery since I could only work on it during naps, but it came together perfectly. Today I am going to share a tutorial with you on how I made my bunting banner. Tomorrow I will post pictures of the finished banner (or you can check out the one I posted on Instagram for a little sneak peak). I was originally going to include fabric flowers similar to the ones on the bunting in the book, but my husband said they looked too busy with everything else in the banner. I will post a tutorial on the flowers anyway very soon. Hopefully I find some way to use them. If not, they may just end up in my shop.
Appliqued Bunting Tutorial:
Supplies:
- Triangle template (I used the Fons and Porter template)
- Rotary cutter and cutting surface
- Felt
- Fabric for applique
- Fusible web
- Embroidery floss
- Scrap of cardstock or cardboard (at least 4" square)
- Ruler
- Paper-cutting scissors or craft knife
- String, yarn, twine, or quilt binding
Directions:
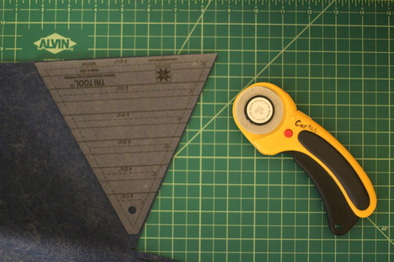
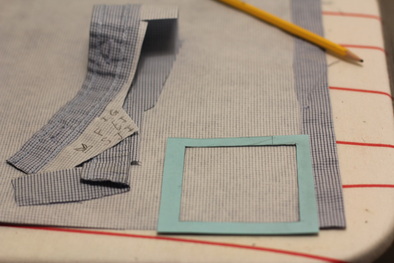
Place your triangle template (mine measures 6 3/4" wide and long) so that the top edge lines up with a flat edge of your felt and close to one side. Use your rotary cutter to slice through the felt on the two long sides of the template. Set the resulting triangle of felt aside. Flip the template so that the short edge is now at the bottom and one of the long sides matches up with the newly cut edge of felt. You should only have to make one slice with your rotary blade to cut another triangle from the felt. Continue cutting triangles in this way, flipping the template after each one.
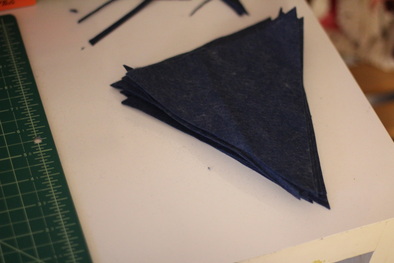
Continue cutting and stacking up your felt triangles until you have one for each letter (or other shape) you want to make.
The next step is to make a template for your letters to make sure they are all the same size. If you are going to use printed and transferred letters, you can skip this step (but make sure that you print or trace your letters in reverse).
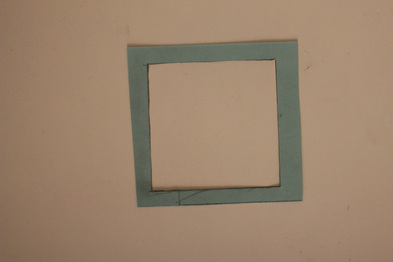
Cut your piece of cardstock to about 4" square. A little more is fine, but less would make the template window unsteady. Measure and draw a 3" square in the very center of the paper and use your scissors or craft knife to cut out along the line. You should end up with something similar to the template pictured here.
Cut your piece of cardstock to about 4" square. A little more is fine, but less would make the template window unsteady. Measure and draw a 3" square in the very center of the paper and use your scissors or craft knife to cut out along the line. You should end up with something similar to the template pictured here.
Now to prepare the applique fabric. Iron the fusible web to the wrong side of your fabric. After ironing, leave the paper backing on so you can draw/trace your letters onto it.
Place your template at one corner of the fusible web-backed fabric. Make sure the grain line is parallel to the sides of your template (either top to bottom or side to side parallel is okay). Before outlining your letters, it can be helpful to write them on a piece of scratch paper just to make sure you have an idea of how you want them to look.
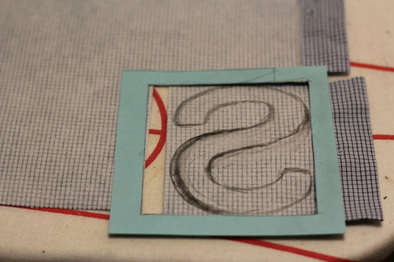
Freehand (or trace) each letter you want for your bunting banner. Make sure the letters are written backwards (they will be forwards when you turn them over and iron them down). Most letters will not need the entire 3" width as this will make them look misshapen. Reserve the whole 3" for letters that have diagonals (such as A, V, M, and W), which will look better at this width. Be aware that erasing on the paper backing will cause it to come up from the fusible web, so keep erasing to a minimum.
Cut out each letter along the drawn line. Pencil markings tend to rub off on your fingers, so be careful not to get it on the fabric (especially if you are using a light-colored fabric). If you are more sure of your sketching abilities, just use pen.
Cut out each letter along the drawn line. Pencil markings tend to rub off on your fingers, so be careful not to get it on the fabric (especially if you are using a light-colored fabric). If you are more sure of your sketching abilities, just use pen.

Remove the paper backing from one letter. Center it on a flag about an inch from the top edge. Lay a piece of fabric over the flag (being careful not to shift the placement of the letter) to avoid melting or shrinking your felt, depending on what it is made of. Iron for about ten seconds (or according to the product instructions) over the entire letter space. Repeat the process for each letter and flag.

Use three strands of embroidery floss in your chosen color(s) to embroider around each letter. I chose to do a blanket stitch (here is the best and most comprehensive tutorial I've found). I was lucky to have a set grid on my applique fabric, which helped keep my stitches even.
Once all your flags are done, string them up using your chosen method and add embellishments if you'd like. Don't forget to post your own project according to the contest guidelines. And feel free to link to them here, too. I'd love to see what you were inspired to make.

