Making It Up as I Sew Along
  • Blog
  • About
  • Gallery
  • Shop

Image Transfer for Print-at-Home EPP Templates - Tutorial

5/21/2016

0 Comments

 
 I've lost count of the times I've needed to go to the copy shop to print on heavyweight cardstock for my English Paper Piecing templates.  Most times I just don't want to deal with taking my son in with me.  It's not always a fun experience (him wanting to touch everything and scream at people and all).  Of course, this means that my EPP projects often get stalled simply for a lack of toner on paper.  Well, I finally figured a way out of having to go to the copy store at all.  Plus, for me at least, doing it at home takes the cost from $1 per page to about 25 cents.

The simple tutorial I have for you today is all about how to use a colorless blender pen to transfer a printout from any black-and-white laser-printed image to your choice of paper.  Here's what you'll need:

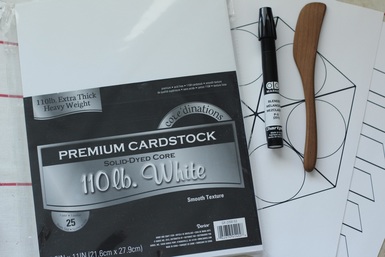
 - Colorless blender pen (Chartpak makes a really nice one)
 - Cardstock or other paper in the weight you prefer (non-glossy is best)

 - Burnishing tool (such as a bone folder or wood spreading knife)
 - Laser-printed page(s) with your chosen design (each page can only be used once, so you will need one printout for each image-transferred page)

Instructions:
​
Picture
Gather your materials.  You can save on paper costs by getting it when it's on sale and stocking up for future projects.  You probably have a burnishing tool around your house.  A spoon or wood knife work fine.  You can find a blender pen at almost any fine art supply store or online.  For your laser-printed image, any will do.  I often have my husband print at work, and the library is my backup option.

Picture
Place your chosen paper on your work surface.  Put your printout right side down on top of the paper, aligning all the edges.

Picture
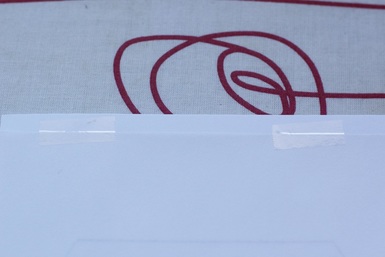
If you have a little wiggle room in your printout margins, scoot the printout down 1/4" to 1/2" and tape the pages to each other and to your work surface to stabilize the pages and prevent a misaligned transfer.

Picture
Open a window.  Seriously, open it.  All the way.  If you don't have a window to open, go outside to do your transfer.  Ventilation is key with the transfer pen.

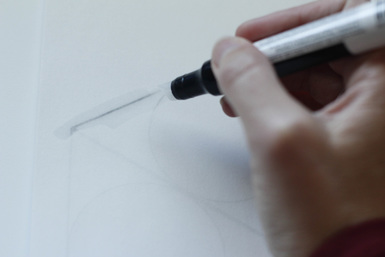
​Use your pen to draw over the printed lines on your printout.  The liquid dries pretty quickly, so work in smaller sections if you have a large design to transfer.

Picture
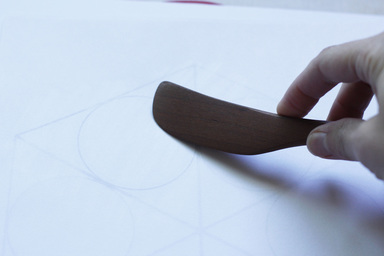
Use your burnishing tool to rub over all the lines you drew over with the blender pen.  Continue drawing over and rubbing the lines until you have completed the page.

Picture
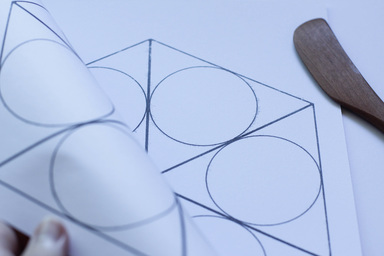
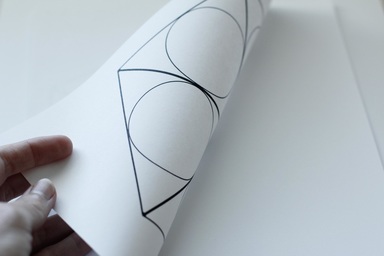
Carefully lift the printout to check that all the lines have transferred.  If the original copy had thick or very dark lines, it may cause the pages to stick together.  If this happens, peel slowly to avoid tearing.  Don't worry too much about little gaps or splotchy areas.  If the transfer is really splotchy, though, try printing with less toner by lightening the print setting.

Picture
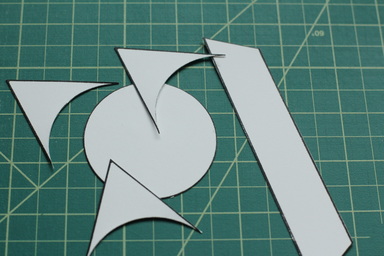
If you are using your image transfer for English Paper Piecing, your paper is now ready to cut out the templates.  The transferred image should be permanent, but, just to be safe, put the black lines towards the back of your basted shape (the seam allowance side) to prevent any from rubbing off where it can be seen.

I hope this technique is as useful for you as it has been for me.  Several of my EPP projects have moved forward now and I can't wait to show you what they are.
0 Comments

EPP Tips - Part II

4/18/2016

0 Comments

 
I'm in the middle of making my third English Paper Piecing pattern (the first one is still being written, but you can see it here, and the second one is currently for sale in my Etsy shop).  Every time I work on a new design, I learn something or realize I've been doing a technique differently that others may find helpful to learn as well.  Here is a roundup of techniques all related to troubleshooting or polishing the look of your finished piece.  When you have a problem (big or small), it can often be traced to one of these seemingly minor fixes.  If you need help with basic stitching techniques, you can see Part I of my EPP Tips.
​​
Picture
Tighten loosely-wrapped fabric.  Sometimes, after basting, you might find that the fabric is too loose on the paper piece.  There a couple things you can do about this.  First, make sure to finger press as you baste and tack the fabric to the paper piece.  Second, make sure each of the folded sides of the fabric is flush against the edge of the paper piece before basting or tacking that side.  Third, after basting, use the tip of a hot iron to nudge the fabric from the edge to the center to tighten it up as you press.  You can also use a fingernail to gently pull the seam allowance towards the center of the paper piece to tighten it as you iron (just be careful not to burn yourself).

Picture
Hide the knot in the seam allowance.  When I first started out with English Paper Piecing, I didn't pay any attention to knot placement...until my working thread got caught on it over and over while sewing.  Then, while watching a video on EPP, I heard about hiding the knot in the seam allowance.  I started doing it, but I hid the knot in the seam allowance of the piece closest to me.  It worked fine, but it threw off the look of the whipstitch because I had to do a bit of crisscrossing to make sure the corners were securely stitched together.  Then, one day, I realized that the better way would be to hide the knot in the seam allowance of the piece farther from me in order to maintain the rhythm and appearance of the stitch.  So I changed my method and my sewing became faster and easier.

Ease pieces together.  There are times when you will find that your pieces do not meet up perfectly.  There are a few ways to handle this.  The first thing to try is gradually easing the pieces together from the beginning of the length of the sides, using the natural stretch in the fabric where possible.  This is easiest when the side you are stretching is on the bias, less easy when the side you are stretching is with the cross grain, and very difficult when the side you are stretching is with the grain.  In the latter instance, it may work better to ease the larger piece down a little by warping the paper piece slightly while stretching the shorter piece.
​
Ease pieces together using the "flags."  Another way to get your pieces to match up is to use the fabric in the flags (where the seam allowances overlap and extend beyond the paper piece) to add a bit of extra fabric on the end that doesn't quite match up.  Click the arrows in the slideshow on the right to see the example photos as I describe the process.  

​
As you approach the end of the pieces, fold down (or up) the little flag of fabric at the corner, stretching it a bit with your finger so that the fabric pops out a bit from the flag and fills in the gap.  Continue sewing to the end of the pieces.  Unfold your pieces to see them match up perfectly!  Note: This fix works best when there is some stretch in the fabric, such as on the bias.
Ease pieces together using the seam allowance.  A third way to help pieces match up is to unfold a bit of the seam allowance to make the fabric shape bigger.  Click the arrows in the slideshow on the right to see the example photos as I describe the process.

First, look at which piece is too short.  Then, look to the edge of that piece that is too short (in the example photo, you can see that the right edge of the front piece is too short).  At the top corner of the too-short side, use your needle to gently pull or stretch the fabric from the seam allowance so that it unrolls just a bit and the edge meets up with the longer edge of the other piece (it's a bit difficult to photograph this step).  Finish sewing the pieces, then unfold and see how they match up!  
Picture
Prevent gaps at corners.  One of the biggest problems EPP-ers face is a gap where points come together.  This is particularly common when you have lots of points meeting or when you are assembling segments that include several points in each.  One way to combat this situation is to take an extra stitch or two right at the meeting of points as you sew them together and make sure the stitches are taut.  Another way is to make sure to sew through the very tip of every point, even if it means making your stitches closer together for adjacent points.

Picture
Fold paper pieces accurately.  With some EPP patterns, you will have to fold the paper pieces in order to sew sides together.  When I first started with EPP, I folded without thinking about how I did it.  What I soon found was that I had to exert extra force with my fingertips in order to keep the alignment of the sides I was sewing.  This tired out my fingers faster.  I found that folding the paper pieces in a line that corresponds to the sides you are sewing makes them much easier to sew.  You can see in the image at the right that the fold creates a straight line that follows from the sides being stitched.

I hope these tips help you in your EPP journey.  If there are any issues you've faced that you're unsure how to solve, let me know in the comments and I'll try to give an answer by replying to your comment or in my next post of EPP tips.  
0 Comments
    Picture


    Carley Biblin

    Hi.  My name is Carley.  I love to sew, craft, and create. As a Jane-of all-crafts so to speak, I enjoy sewing, writing, cooking, drawing, photographing.  But the constant thread (if you'll excuse the pun) throughout my weeks is needle arts. 
    I hope you'll join me in
    Making It Up As I Sew Along.
    Learn More...

    My Etsy Shop

      If you'd like to sign up to receive my newsletter, type your email address in the box below and get news, tips, and other neat stuff delivered to your inbox.

    Submit
    Instagram

    Archives

    January 2017
    December 2016
    November 2016
    October 2016
    September 2016
    August 2016
    July 2016
    June 2016
    May 2016
    April 2016
    March 2016
    February 2016
    January 2016
    December 2015
    November 2015
    October 2015
    September 2015
    August 2015
    July 2015
    June 2015
    May 2015
    April 2015
    March 2015
    February 2015
    January 2015
    December 2014
    November 2014
    October 2014
    September 2014
    August 2014
    July 2014
    June 2014
    May 2014

    Categories

    All
    Arts & Crafting
    Books & Music
    Celebrations
    Embroidery
    Family Photos
    Fixing
    Guest Posting
    Inspiration
    Kids & Family
    My Week
    Parenting
    Photo Tour
    Present Moment
    Recap And Goals
    Recipes & Food
    Reviews
    Sewing
    Shop Update
    Swaps
    Tips And Techniques
    Travel
    Tutorials

Powered by Create your own unique website with customizable templates.